StoreFAQ helps you add an AI-powered chatbot to your Shopify store that answers customer questions in real time. The AI agent uses your store information, FAQs, products, policies, and blogs to give instant, automated replies so shoppers get help around the clock without waiting for a human agent.
Learn how to configure an AI chatbot in Shopify using StoreFAQ. This will help you enable the AI agent, connect it to the right content sources, train it on your store data and launch automated live chat support across your store.
AI Chatbot in StoreFAQ #
The AI Chatbot is an automated live chat assistant that responds to customer questions using the content already published on your Shopify store. Instead of writing answers manually, you select which content the AI should learn from, and the chatbot generates accurate, on-brand replies on its own.
Here is why it is worth using:
- Instant, 24/7 responses: Customers get answers immediately, even outside business hours.
- Store-specific answers: The AI pulls from your products, store policies, FAQs, and blog posts, so its replies reflect real store information such as pricing, availability, and product details.
- Less support workload: Routine questions are handled automatically, freeing your team to focus on complex issues.
- Higher conversions: By guiding shoppers, clearing purchase doubts, and recommending products, the chatbot helps recover potentially lost sales.
How to Configure AI Chatbot using StoreFAQ? #
Follow the step-by-step guide below to set up the AI Chatbot from the Settings tab.
Step 1: Enable AI Chatbot #
Before you start, make sure you have the StoreFAQ app installed on your Shopify store.
To open the feature, go to your Shopify dashboard, find StoreFAQ under the Apps section in the left sidebar, then click StoreFAQ→AI Chatbot.
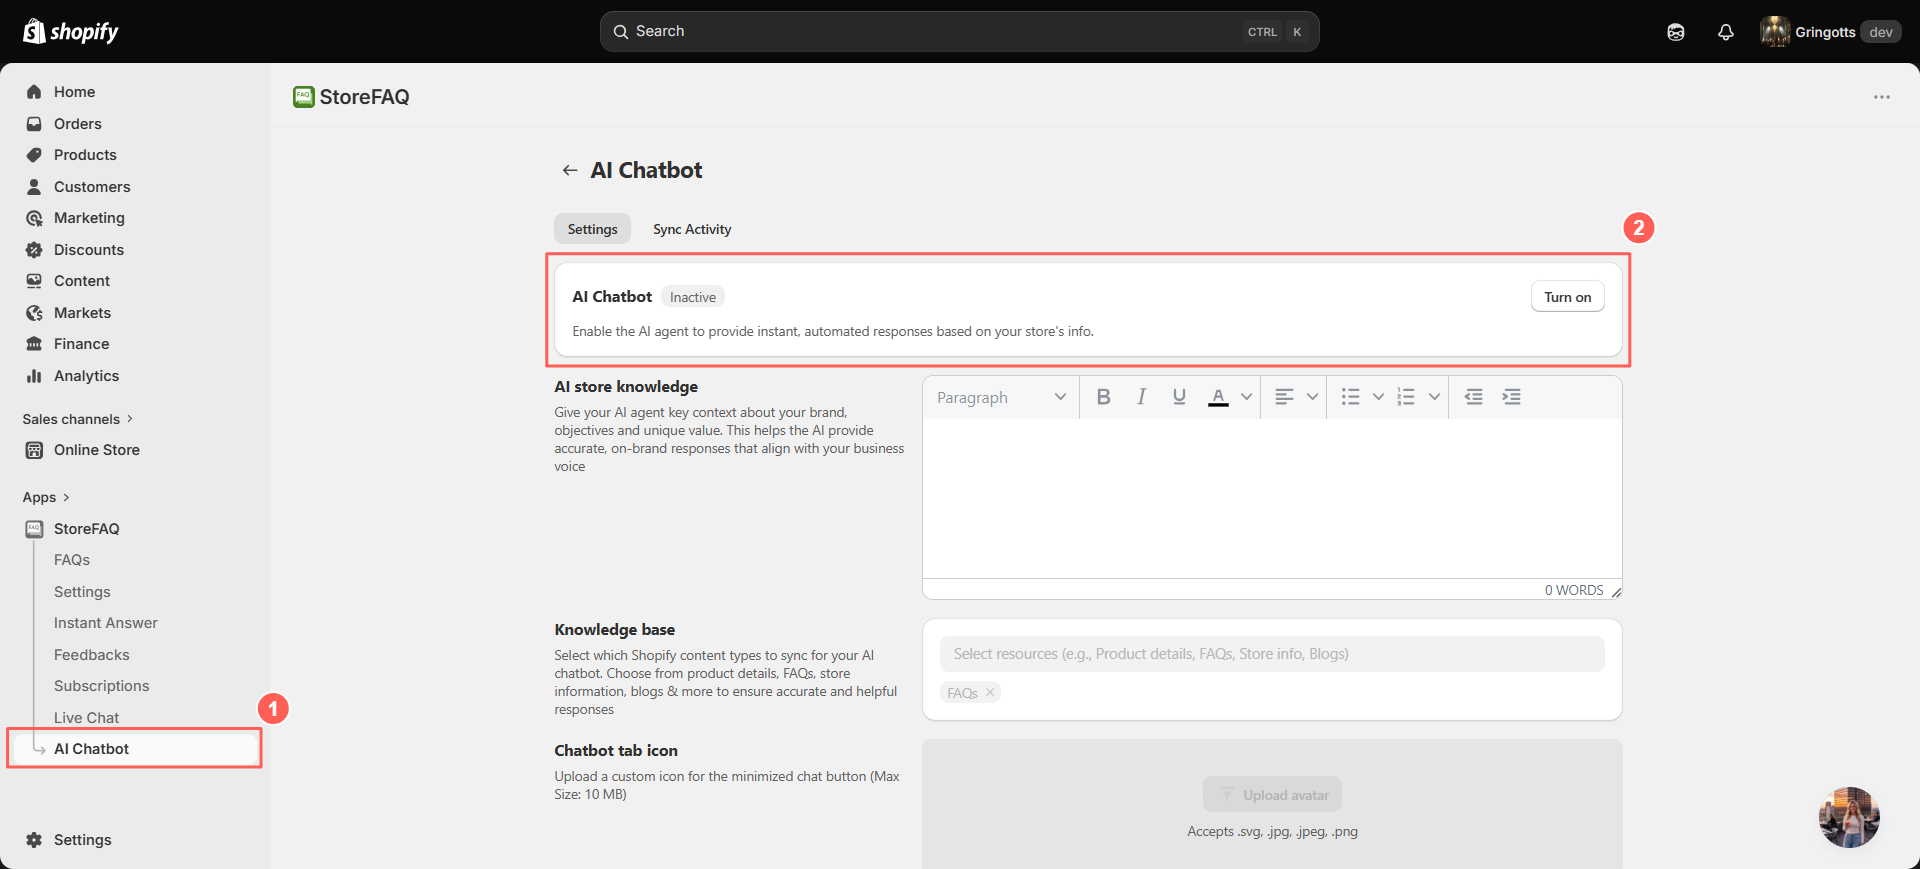
After turning on the toggle, click ‘Save’ to save your changes.
The AI Chatbot screen has two tabs at the top:
- Settings: Where you enable the chatbot and configure how it works.
- Sync Activity: Where you train the chatbot by syncing your store content and monitor the sync status.
Step 2: Add AI Store Knowledge #
In the AI store knowledge section, you give the AI agent key context about your brand, objectives, and unique value.
Click inside the text editor on the right. Type a short description of your store, what you sell, who you serve, your tone and any key selling points.
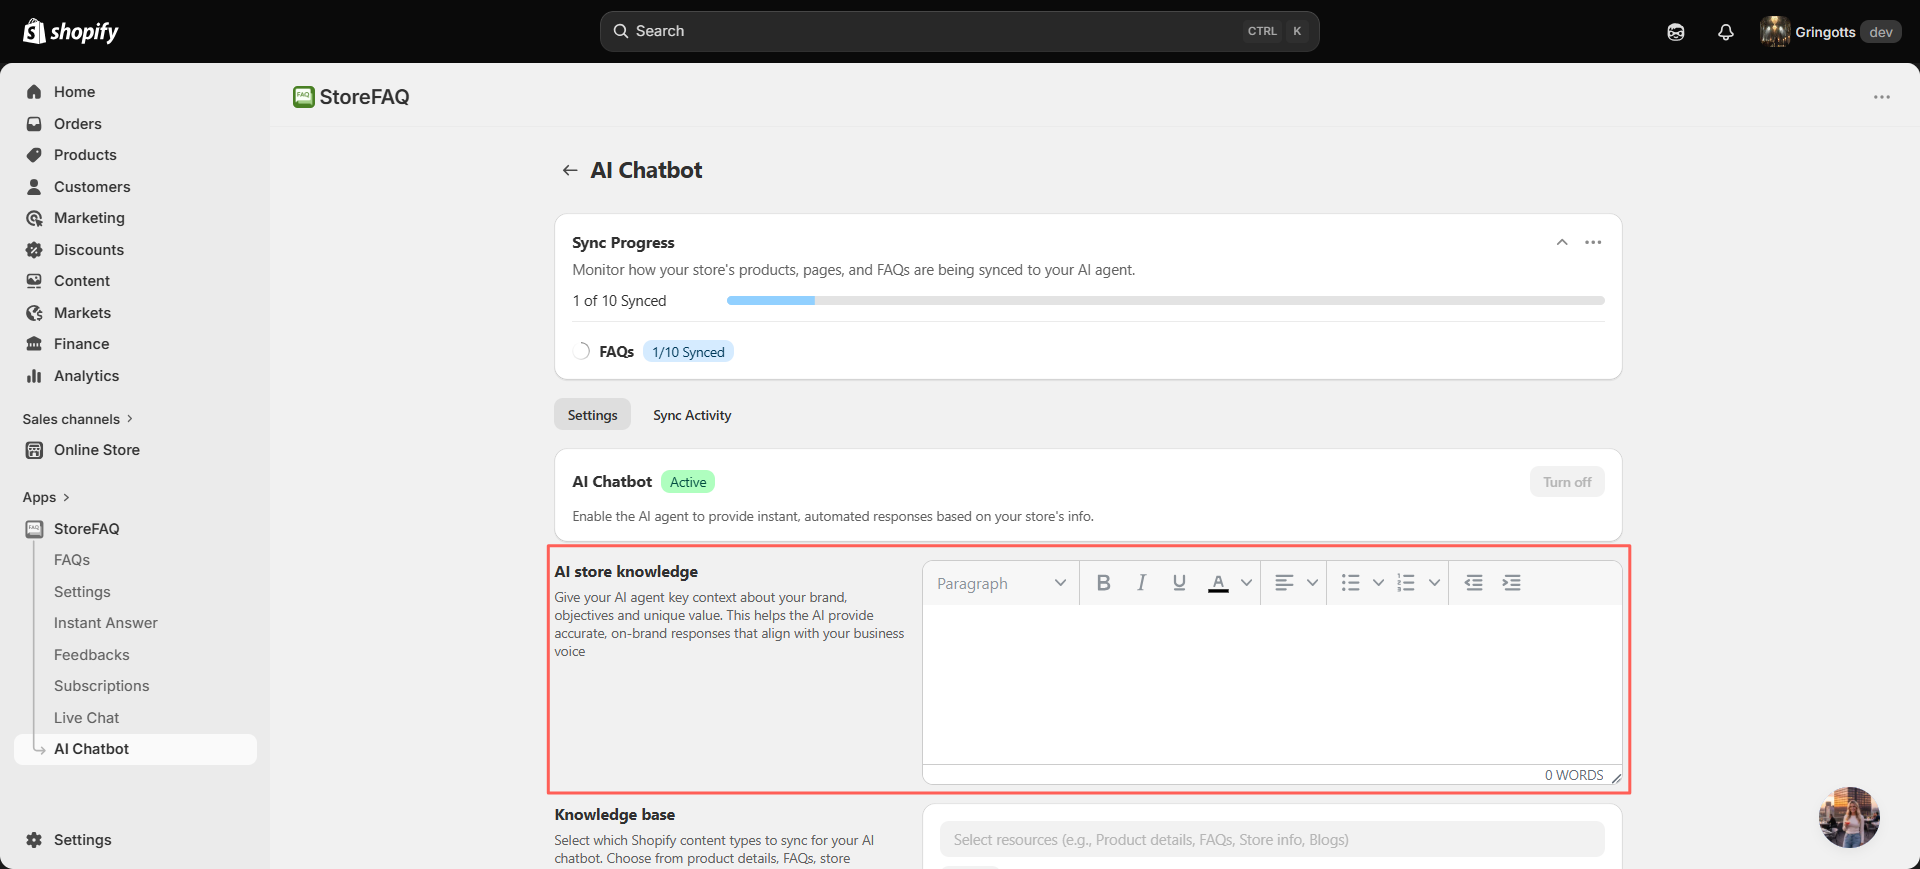
After adding your store knowledge base content, be sure to click ‘Save’ to apply the changes.
Note: Mention your store name, product categories, brand voice and anything you want the AI to emphasize.
Step 3: Select Knowledge Base Sources #
The Knowledge base section controls which Shopify store resources the AI chatbot is allowed to learn from. The help text notes that you can choose from “product details, FAQs, store information, blogs & more to ensure accurate and helpful responses.”
Click the ‘Knowledge base’ dropdown (placeholder text: Product details, FAQs, Store info, Blogs). Choose the resources you want the AI to use. In the example, the selected sources appear as removable chips: Products, Store policies, FAQ, Blog post,etc. To remove a source, click the ‘✕’ on its chip.
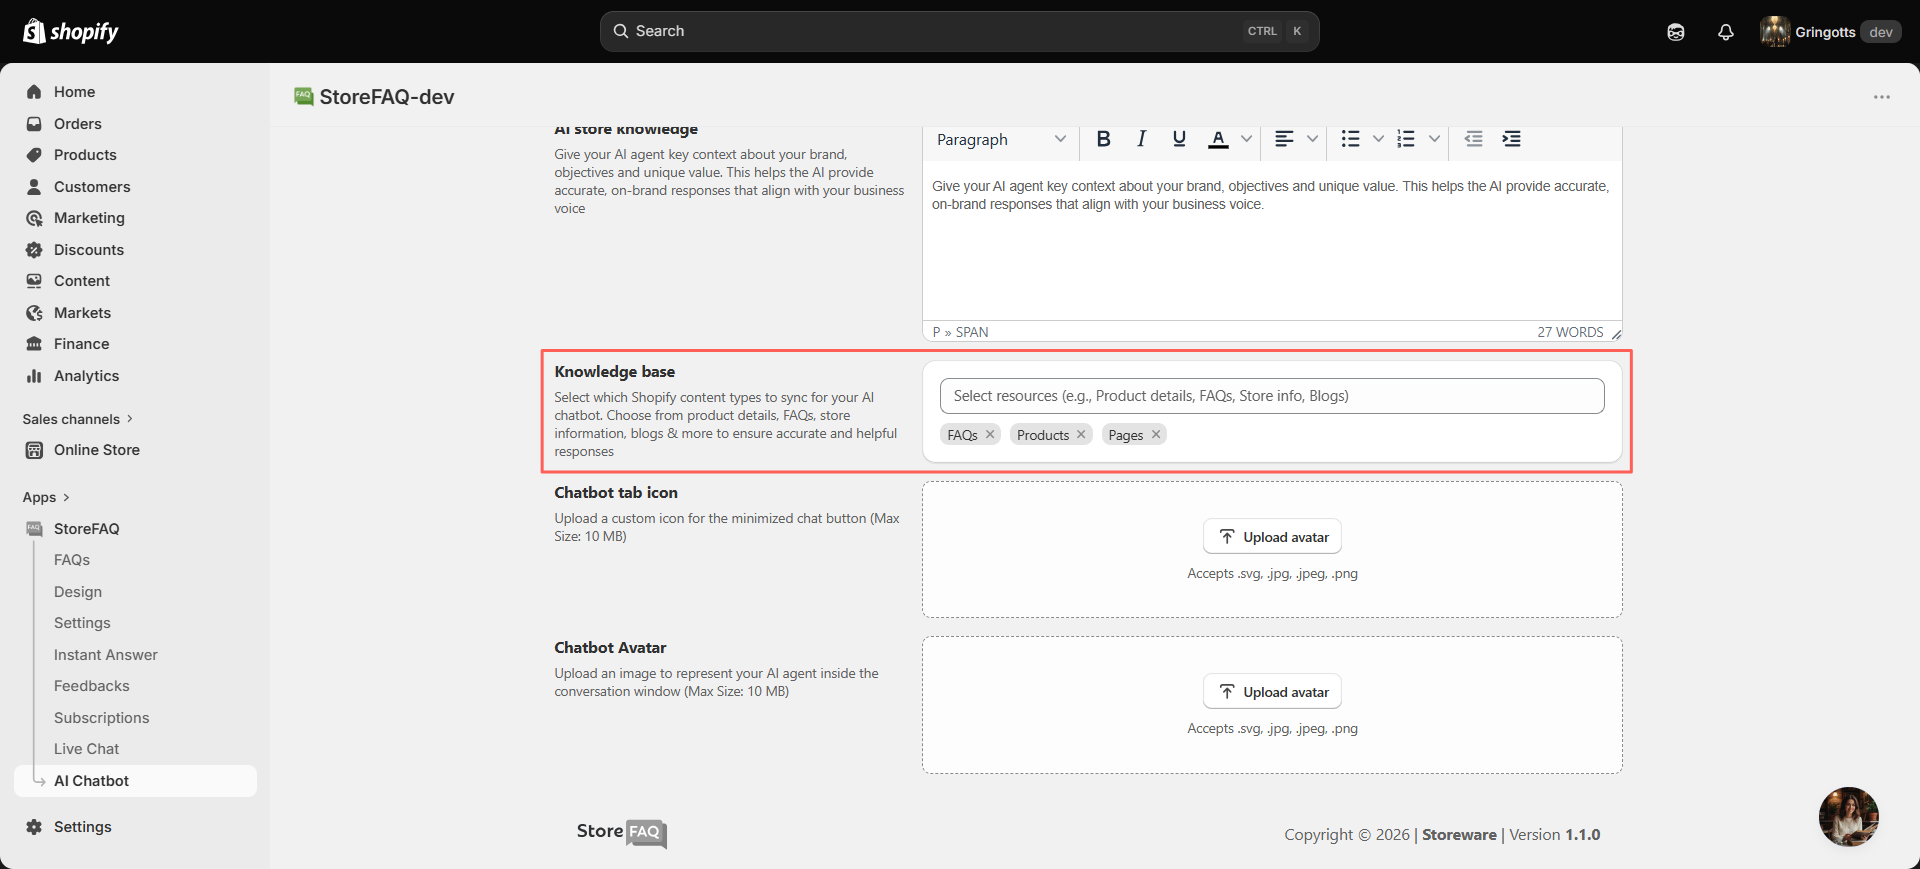
Once you have added your store knowledge base sources, click ‘Save’ to save your changes.
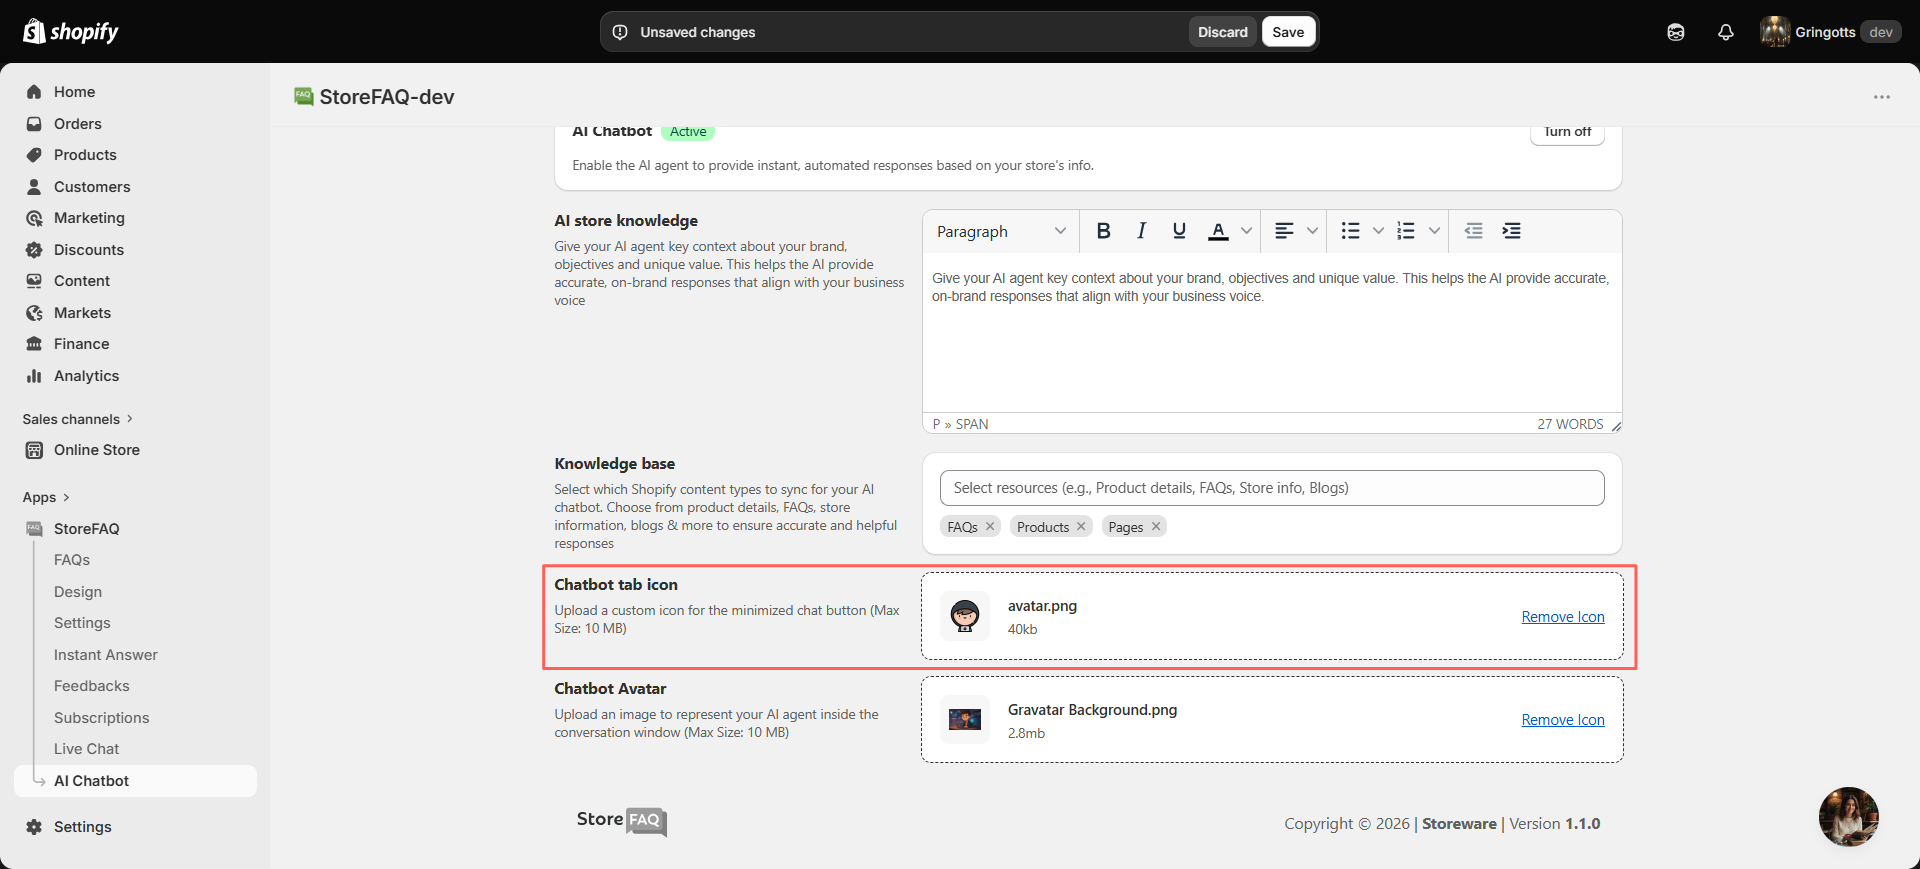
Step 4: Upload the Chatbot Tab Icon #
The Chatbot tab icon is the image shown on the minimized chat button (the launcher) that customers tap to open the chat.
Click ‘Upload avatar’ under the Chatbot tab icon. Select an image file. Accepted formats are .svg, .jpg, .jpeg, and .png, with a maximum size of 10 MB.
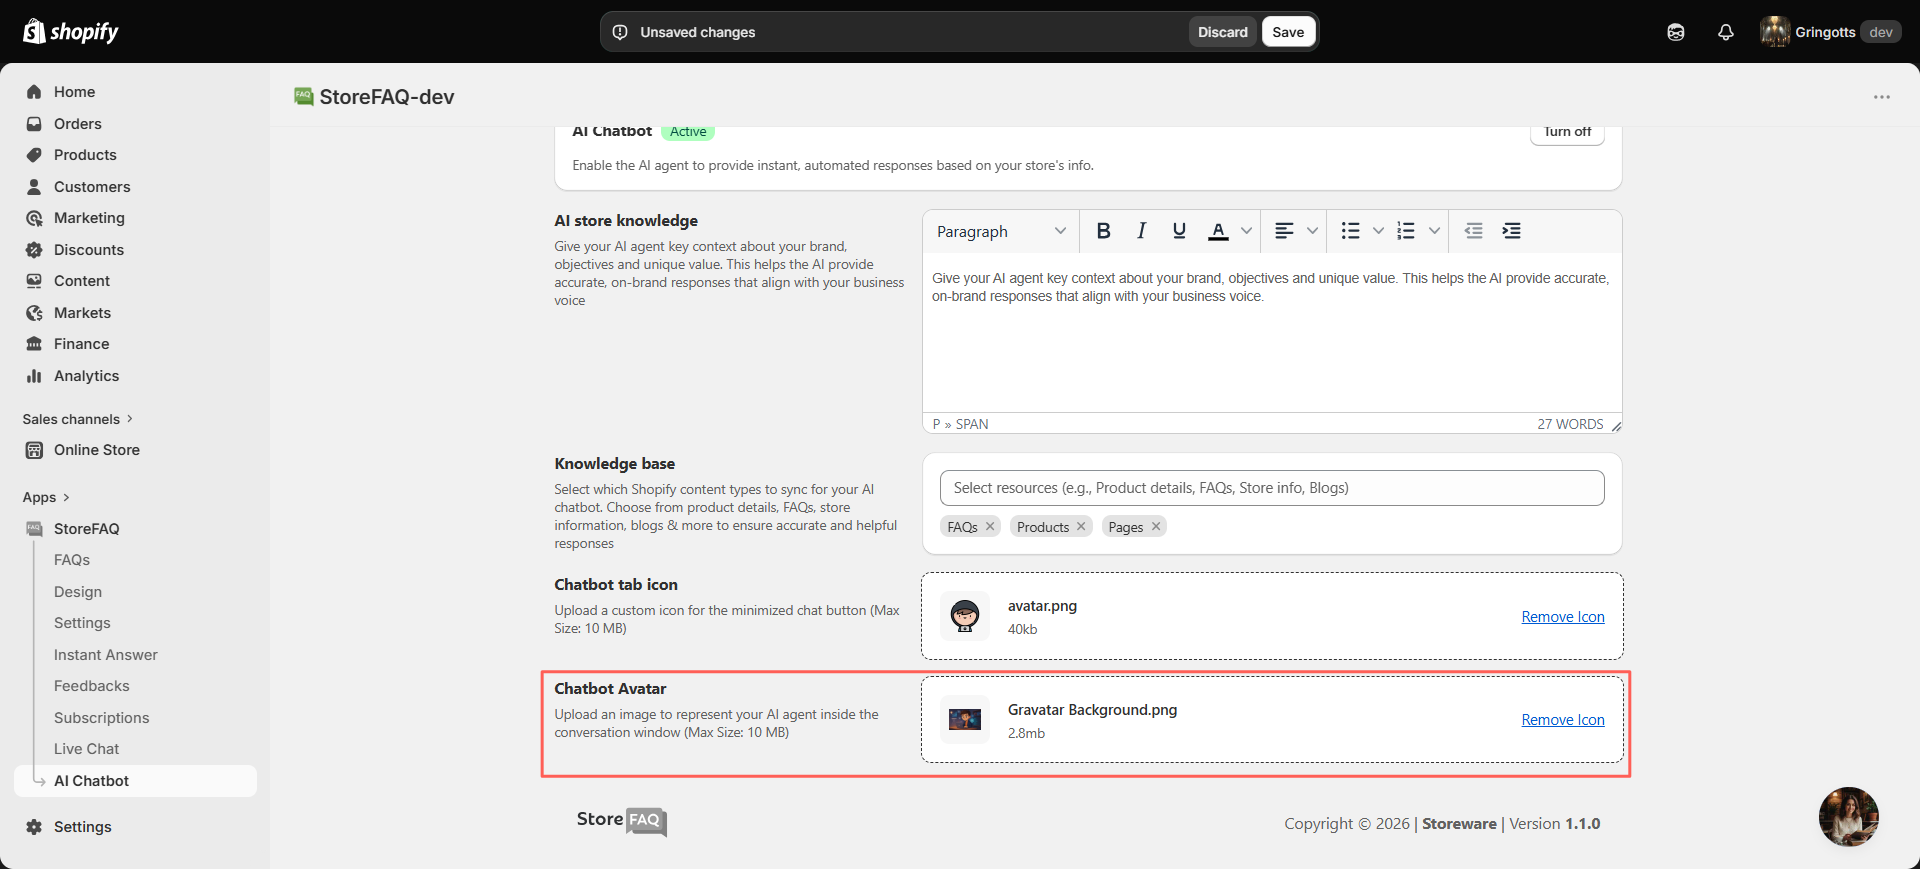
Step 6: Upload the Chatbot Avatar #
The Chatbot avatar is the image that represents your AI agent inside the conversation window.
Click ‘Upload avatar’ under Chatbot avatar. Select an image file. Accepted formats are .svg, .jpg, .jpeg, and .png, with a maximum size of 10 MB.
Remember to ‘Save’ your changes after configuring these settings so they apply to your live store.
Configure AI Knowledge Synchronization (Optional) #
The AI Chatbot learns from your store content through syncing. You manage and monitor this from the Sync Activity tab.
Start Syncing Your Store Data #
When you first open Sync Activity before selecting any sources, you will see an empty state that reads ‘No sync activity found’.
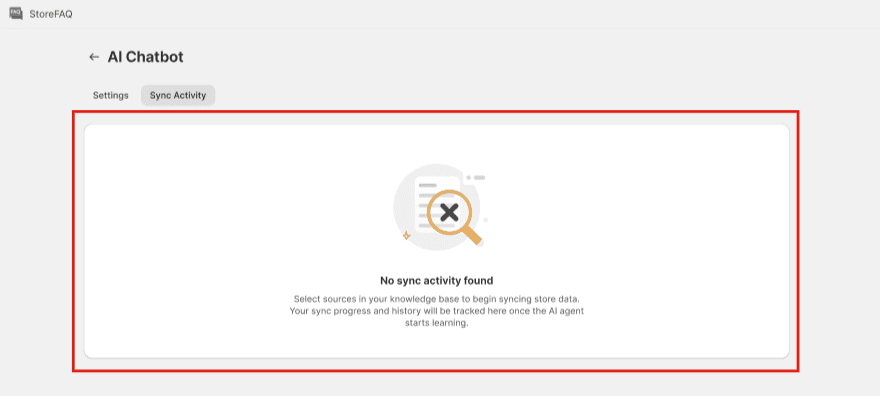
To begin training, go back to the Settings tab and select your store resources in the Knowledge base (see Step 3). Once sources are selected, the AI agent starts syncing and learning from that content.
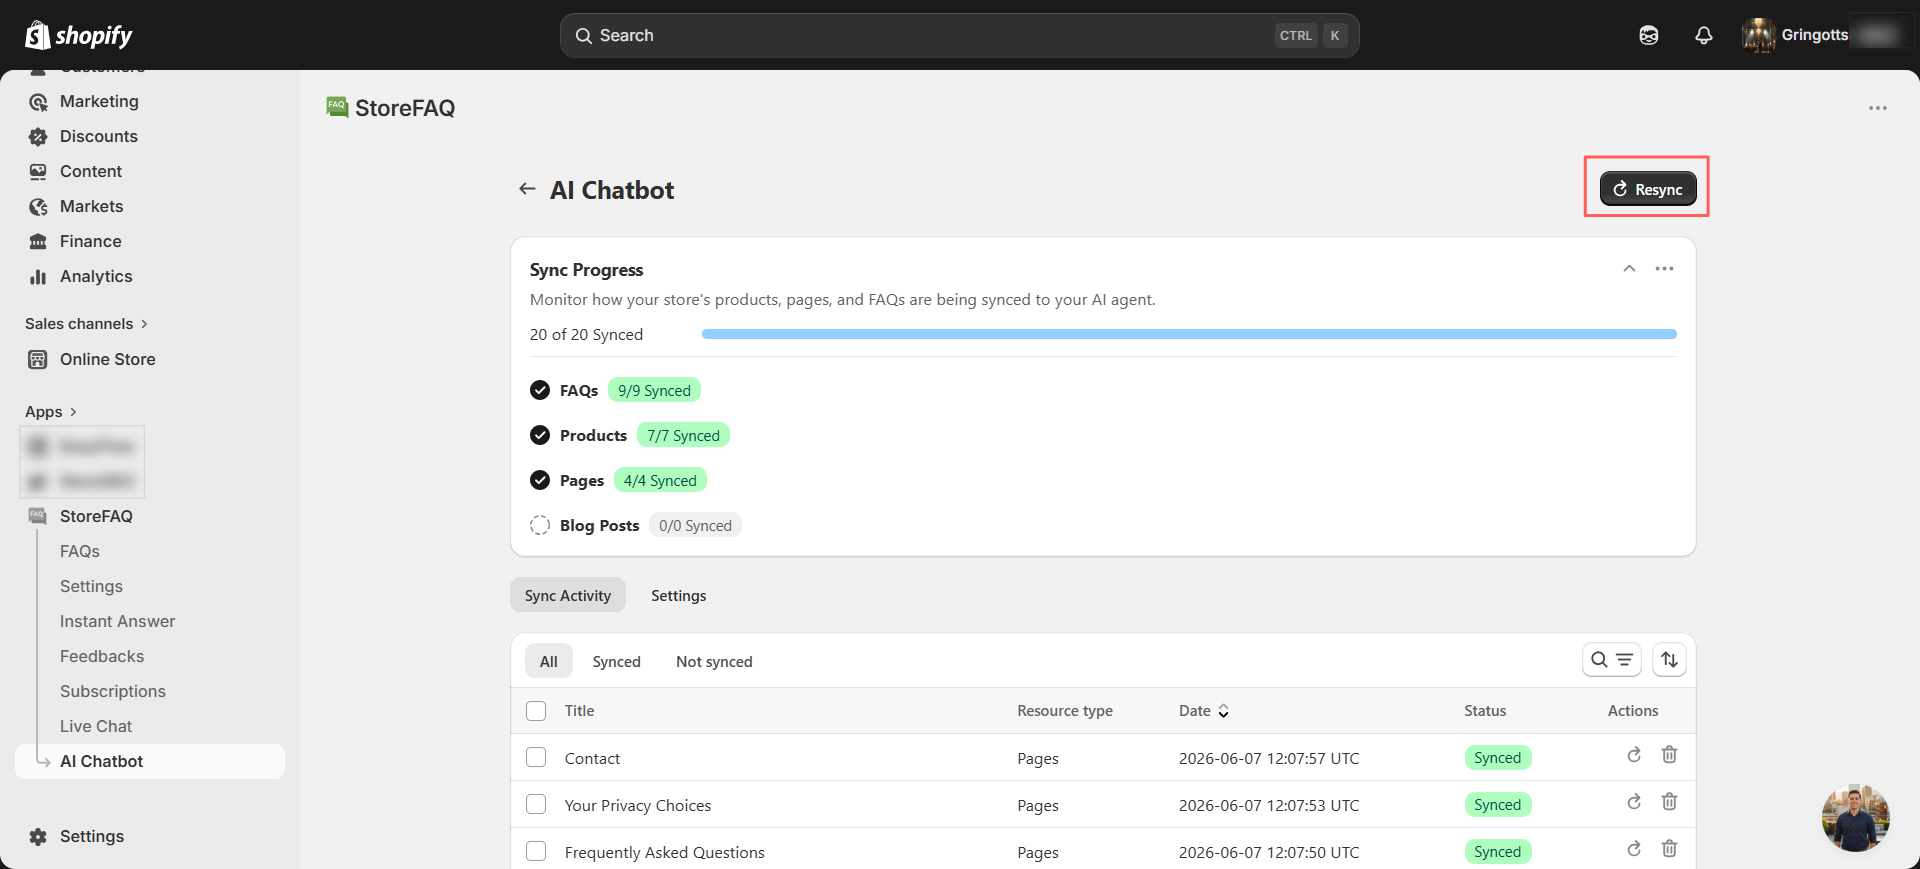
Monitor Sync Progress #
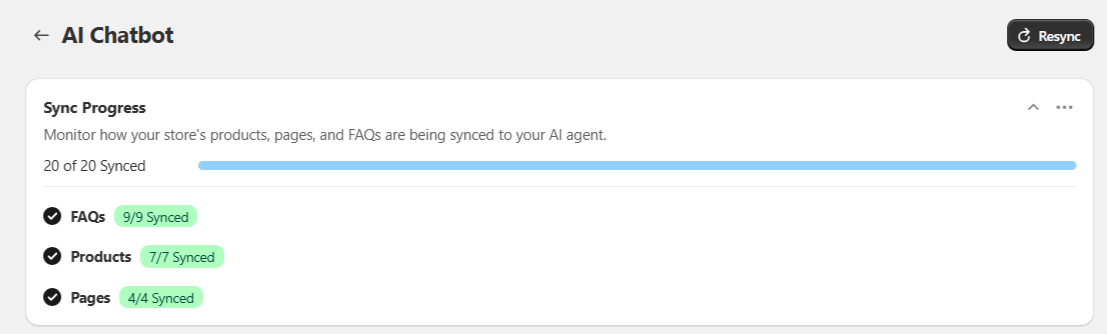
After syncing starts, the Sync Progress card appears at the top of the Sync Activity tab.
The synchronization progress section displays the overall sync status through a progress bar and provides a breakdown of each content source, such as Products, Store Policies, FAQs, and Blogs.
It helps you monitor which content has been successfully synced and identify any items that are still pending or have failed.
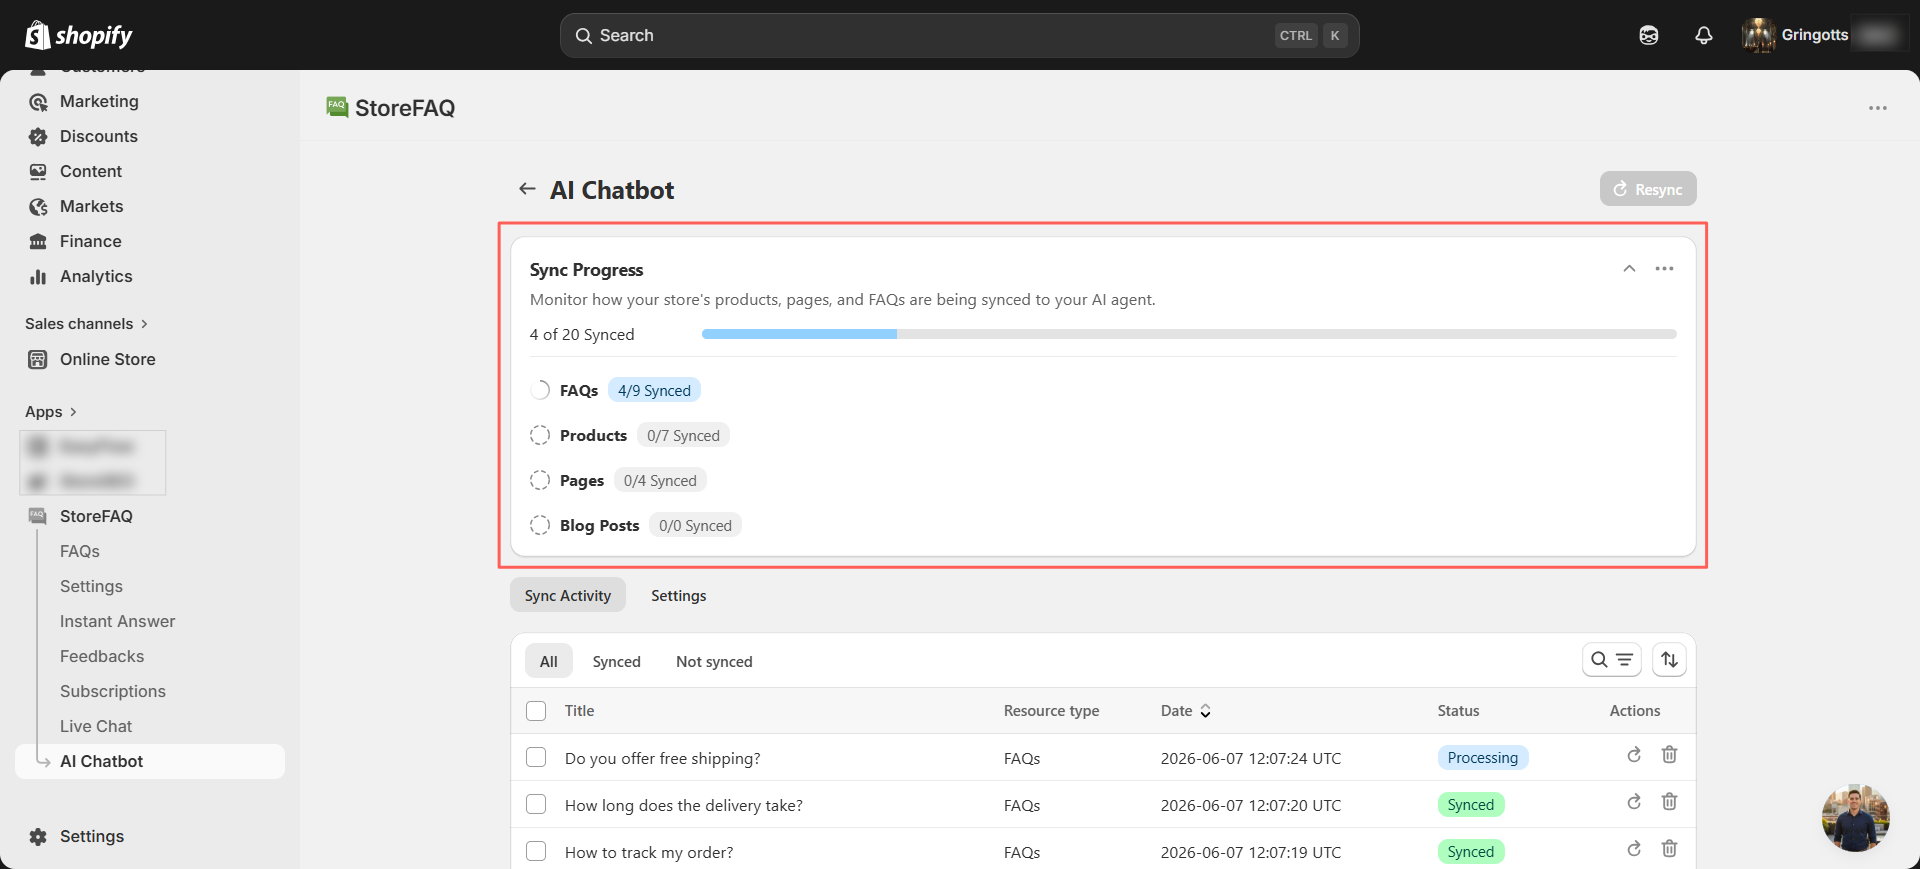
If any content is not synced properly, you can click the ‘Resync’ button to restart the synchronization process and update the affected content.
Once the synchronization process is complete, the status card updates to indicate that syncing has finished successfully.
You can review the overall synchronization status along with the completion status of each content source, including products, pages, store policies, FAQs, and blog posts. After reviewing the results, you can click ‘Dismiss’ to close the notification.
If you want, you can resync your store resources by clicking the ‘Resync‘ button.
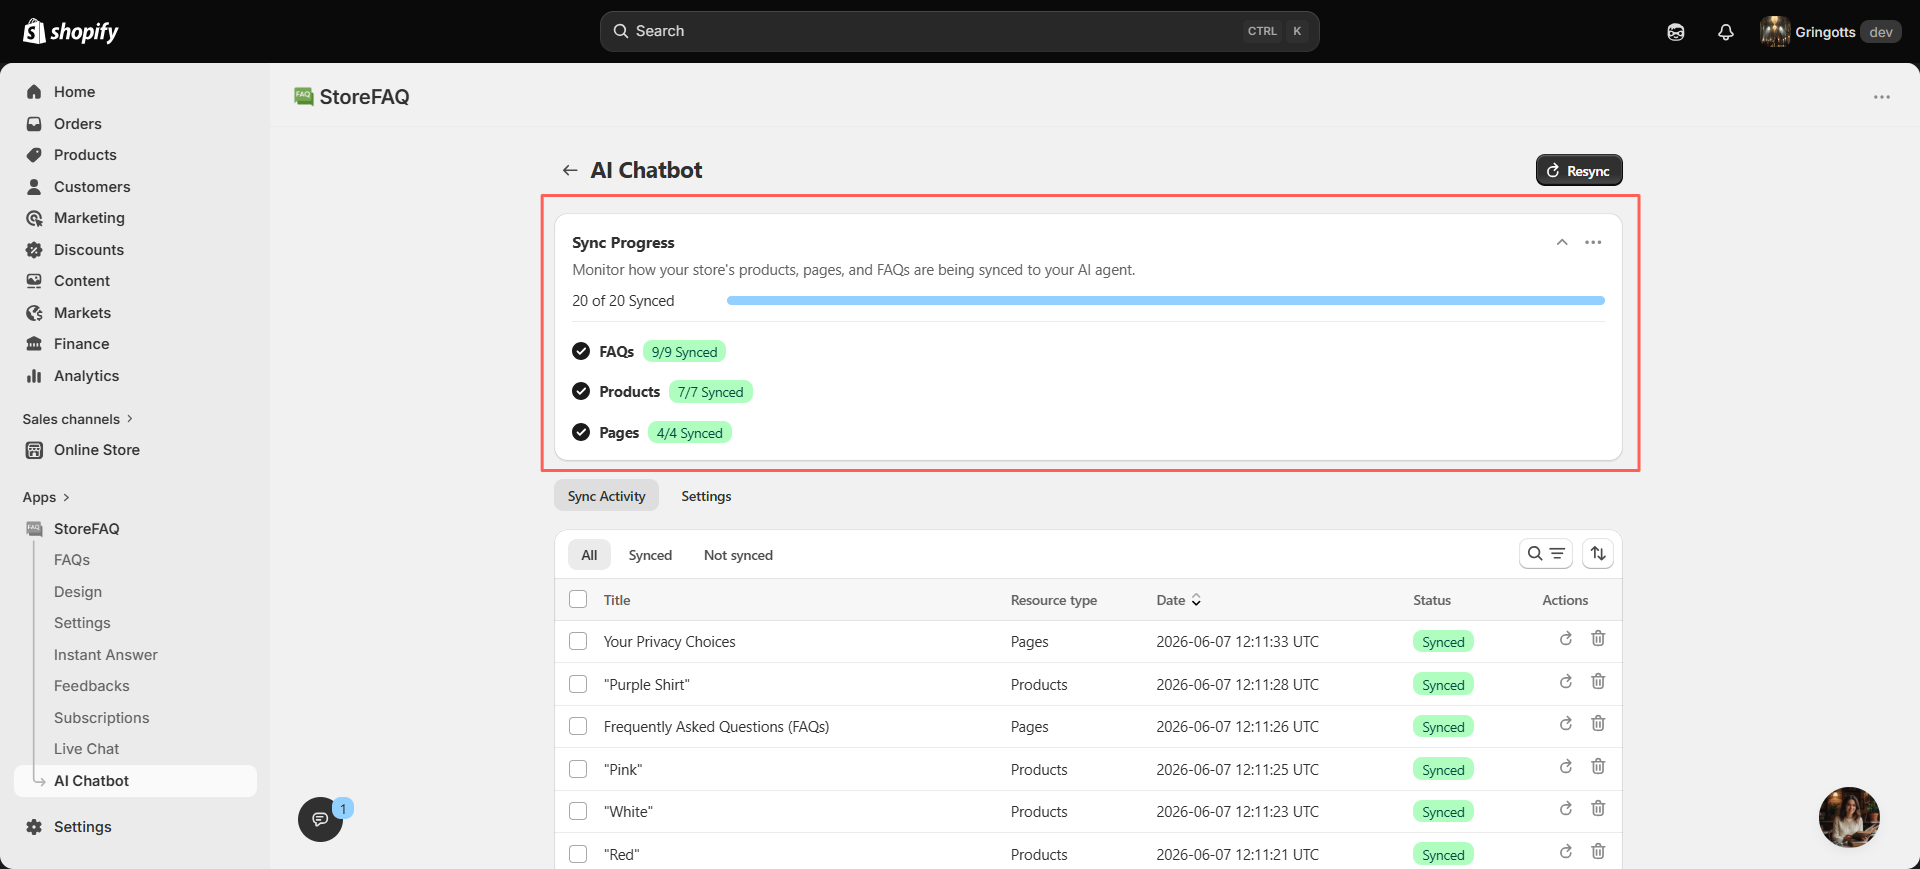
Review Individual Content with the Activity Table #
Below the synchronization progress section, you can view all content sources that have been added to the AI chatbot’s knowledge base. Use the available filters, search option, and sorting tools to quickly find specific content.
Each item is assigned a status to help you track its progress.
- Synced indicates the content has been successfully added to the chatbot’s knowledge base.
- Pending means the content is waiting to be processed.
- Sync Required appears when previously synced content has been updated and needs to be synchronized again.
- Failed indicates that the synchronization was unsuccessful and may require attention.
Final Outcome #
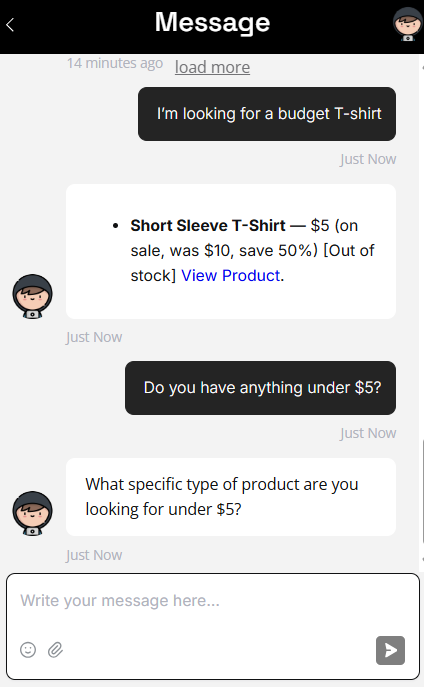
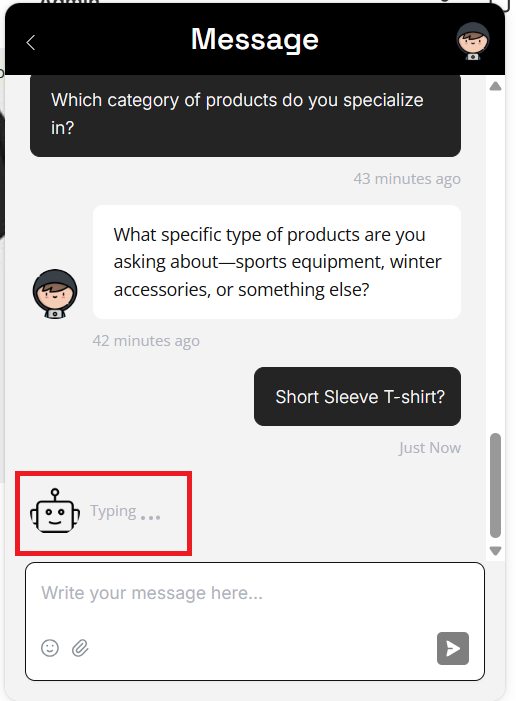
Once everything is configured, the AI Chatbot goes live and starts answering customers on its own. Here is what the experience looks like from the shopper’s side.
When customers visit your store, the chat launcher appears on the storefront.
While the AI prepares a response, a ‘Typing …’ indicator with the agent icon appears, so the customer knows an answer is on the way.
Troubleshooting #
If you face issues with your AI Chatbot, check the possible causes below and fix them quickly.
The chatbot is not appearing on your store: #
Go to StoreFAQ → AI Chatbot → Settings and make sure the chatbot is enabled. If it is turned off, enable it, save your changes, and refresh your storefront.
The chatbot responses are inaccurate: #
Make sure the correct knowledge sources are selected and synced. You can also update your store knowledge description with more details and run a resync to improve response accuracy.
A knowledge source is not syncing: #
Check the synchronization status in the Sync Activity tab. If an item has failed, review the error message and run a resync. Items marked as Pending are still processing, while Sync Required items need to be synced again.
Configuration changes are not reflecting: #
Make sure you have saved your changes. If automatic synchronization is disabled, run a manual resync to apply the latest updates.
That’s it. This is how you can configure AI Chatbot and use it to resolve customer issues while providing better support to your customers.
Need assistance? Feel free to reach out to our dedicated support team for any queries.


